Happy Bungalow’s first arts and crafts show was this past Saturday. The show was around the corner and down the street from my house. This allowed the whole Happy Bungalow crew to attend (my wife, the kids, and I). There was a good crowd turnout and a there was a full array of vendors to buy from. Here’s how my booth looked:
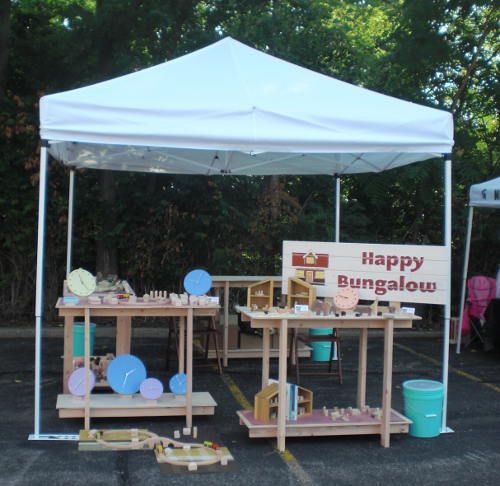
Not only was it my first show, it was my first day selling to the public as well. I was super nervous and for the past few weeks I’ve been focused on little else than the show. Months ago I planned to buy folding tables, but a few weeks ago changed my mind. So I made four wood tables that I could take apart for easier transport. I also made a sign, stands for the clocks, and business card holders. I wasn’t happy with the greenish buckets at the corners, but they kept the awning from flying away (bonus). I thought I could make some (nice) plywood containers and fill them with sand or concrete. We’ll see.
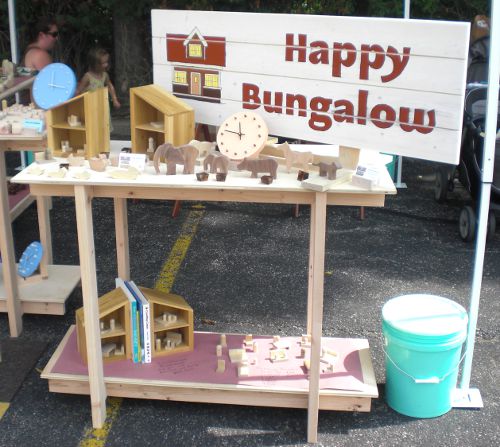
At the finishing stage of the sign I had an accident and before I could do anything the accident dried. My wife couldn’t spot it, so maybe it’s not so bad. Along with the sign I put a sample of all the products on the table. Quite a few people stopped to look. Everyone loves the cute dollhouses and the animals. People liked the knobs too. The tables were unfinished (not enough time) so the rest of the unfinished wood products blended into the table. My wife had the idea to put paper on the table – sort of like butcher’s paper. This worked well as I wrote descriptions of the product and prices on the paper. I like the concept, but I’d like to find a different color paper.
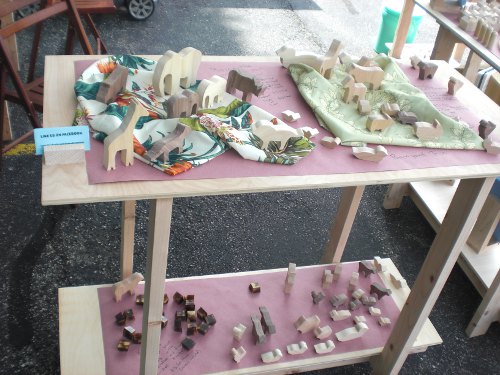
You can get a closer look at the tables – the legs are planed lumber and the tops are birch veneered plywood. They’re lightweight and universally interchangeable. The animals were a big hit – especially the walnut animals. I’ll be making more of those soon. This is where Happy Bungalow’s first sale came from. Not a dollar, but a twenty – I’ll frame it anyway. A super sweet lady at the next booth came over to congratulate me. I made more sales later, handed out business cards, and talked to a lot of people. I can’t wait for the next show.
New Stuff in the Works
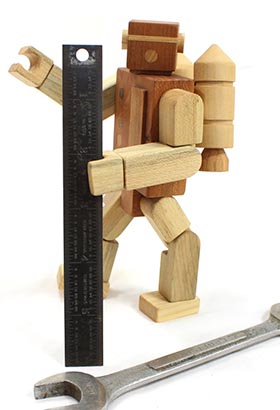
/in Fun Stuff, Prototype /by DonThis week is new product week (and next week and probably the next). On the drawing board: chessboard, serving trays, nifty clocks, plywood graphic paintings, jewelry boxes, and whatever else shows itself. I’m putting together a mockup for a wood starburst clock (see picture below) – trying to figure out how to build the thing. There’s 30+ pieces that need to fit exactly, and while I could draw it to exact dimensions and angles, I don’t think those angles would translate to the finished piece. So I figure I’ll trial and error the operation until I figure out the best method.
Anyway – I liked the mockup – thinking it would look good on a wall by itself. So I’m going to take all the little pieces and transfer the angles to pieces of cherry and glue up with the walnut strips. Now I have to figure out how to glue all the little pieces together just so.
Yesterday I was working on some plywood graphic paintings. I’ve done a few before and like the way they turn out – I figure some other people might too. It’s delicate work and as long as I don’t think about it my hand doesn’t shake – but then it does and I have a little oops. My instant reaction? I look up at the top of the painting for the UNDO button. It’s not the first real life mistake that I’ve looked for a digital correction for.
Happy Bungalow’s First Arts and Crafts Show
/in Business, Kid Approved, Shows /by DonHappy Bungalow’s first arts and crafts show was this past Saturday. The show was around the corner and down the street from my house. This allowed the whole Happy Bungalow crew to attend (my wife, the kids, and I). There was a good crowd turnout and a there was a full array of vendors to buy from. Here’s how my booth looked:
Not only was it my first show, it was my first day selling to the public as well. I was super nervous and for the past few weeks I’ve been focused on little else than the show. Months ago I planned to buy folding tables, but a few weeks ago changed my mind. So I made four wood tables that I could take apart for easier transport. I also made a sign, stands for the clocks, and business card holders. I wasn’t happy with the greenish buckets at the corners, but they kept the awning from flying away (bonus). I thought I could make some (nice) plywood containers and fill them with sand or concrete. We’ll see.
At the finishing stage of the sign I had an accident and before I could do anything the accident dried. My wife couldn’t spot it, so maybe it’s not so bad. Along with the sign I put a sample of all the products on the table. Quite a few people stopped to look. Everyone loves the cute dollhouses and the animals. People liked the knobs too. The tables were unfinished (not enough time) so the rest of the unfinished wood products blended into the table. My wife had the idea to put paper on the table – sort of like butcher’s paper. This worked well as I wrote descriptions of the product and prices on the paper. I like the concept, but I’d like to find a different color paper.
You can get a closer look at the tables – the legs are planed lumber and the tops are birch veneered plywood. They’re lightweight and universally interchangeable. The animals were a big hit – especially the walnut animals. I’ll be making more of those soon. This is where Happy Bungalow’s first sale came from. Not a dollar, but a twenty – I’ll frame it anyway. A super sweet lady at the next booth came over to congratulate me. I made more sales later, handed out business cards, and talked to a lot of people. I can’t wait for the next show.
Happy Bungalow’s First Show
/in Business, Prototype, Shows /by DonHappy Bungalow’s public debut will be on August 20th (click shows above to learn more). Besides making things to sell, I’ve been busy making everything else I’ll need: tables, a nifty sign, display stands, and business card holders. I had a few sketches for complex holders, but opted for something less fussy. The holder is planed smooth lumber with an angled dado. [edit: we now sell business card holders, find them in out online shop by clicking here]
The Playhouse that Started it All
/in Fun Stuff, Kid Approved, Prototype /by DonAs I mentioned in my last post, here’s the indoor playhouse that I built for my daughter (before my son was born). The concept was a gypsy-wagon – the fabric roof and the swing out doors that make up the back wall (also handy for an adult entrance).
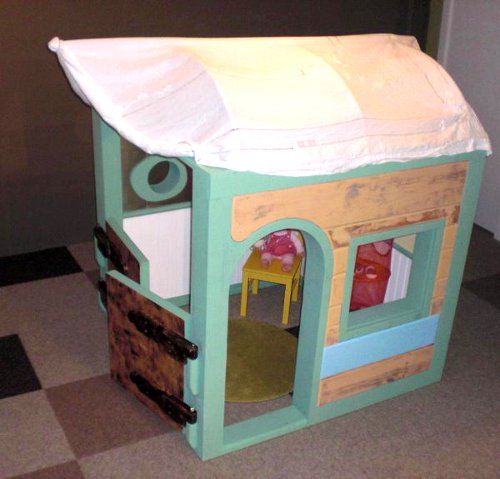
The siding is recycled wood from a previous kitchen renovation project (wood that has been involved in three other projects). It turned out I had JUST enough wood to do the trick, though it took numerous layouts on the floor and swip-swapping of pieces to make it work. Sort of like a devious math puzzle.
I made the hinges (except for old metal hinge pins) from wood and finished them with a torch – a technique I used for the knobs in my kitchen. Inside is a metal wall perfect for magnets. The roof is a cool old tablecloth.