How do you create great product photos? Wait for a sunny day, drag your products outdoors, take four dozen pictures, find the best pic, and endlessly tweak it in Photoshop. No sun? How about you round up all the lamps in your house, take eight dozen pictures, struggle to find one passable photo, and then spend too much time trying to make it look ok.
Thankfully there’s a better way and you don’t have to spend a fortune on professional equipment. You’ll just need to head to the store and pick up a few items.
Here’s your shopping list:
- daylight fluorescent bulbs
- light fixtures
- white sheet (or whatever background color you’d like
- something or someway to hold your lights up (see below)

A note about the light spectrum.
I used a number of light fixtures (you can see 4 in the picture), but you don’t need to. I thought the strip fixture would give good general lighting (it does), but the light isn’t as strong as I thought it would be. The clamp lights seem to deliver the most light and offer great flexibility (they’re about 7 dollars each). I had the trouble light (with the yellow handle) and the blue lamp with taped on cardboard already around the house, so I used them.
It is important that all lights used in the photographing area be daylight bulbs. Non-daylight bulbs will give your pictures a yellowy tint. You’ll want to arrange your lights evenly to give good light to all sides of your product. Or place your lights to one side to create a moody vibe. It’s hard to have too many lights. I went back to the store for reinforcements myself.
Fiddle with your camera.
I have a four year old point and shoot camera that cost a hundred bucks, but it has quite a few handy features. If you have a digital camera, I’m guessing your camera has a few features too. I can adjust my camera’s white balance, brightness / contrast, and lighting type exposure. Then I can save these setting for later recall.
Take some pictures.
I started off lint rollering the white sheet I use for a backdrop before each shoot. But I realized fuzz and minor stains will usually disappear with enough light an proper camera fiddling so know the lint roller gathers dust. The picture below is the result of the setup shown above. 
Stayed tuned for Part II where I’ll discuss the creation of a white box for taking pictures of small pieces and free photo editing software.
D.O.G.
/in Robots /by DonSCOUTed
/in Robots /by DonRobots on the Brain
/in Prototype /by DonI’ve had loads of rave reviews about the new Happy Bungalow robot line (fingers crossed for more). As such I’ve been working on expanding the line. First up are prototypes SC”OUT and DOG I’m working on the back-stories for each.
My wife commented that the DOG robot looks a bit like a sheep. HA! How about Sherpard’s Helper Electronic E-something Protection? I don’t have the name fully worked out, or a working prototype, but I have the backstory – it’s great, but you’ll have to wait.
DIY Lighting for Product Photos
/in DIY /by DonHow do you create great product photos? Wait for a sunny day, drag your products outdoors, take four dozen pictures, find the best pic, and endlessly tweak it in Photoshop. No sun? How about you round up all the lamps in your house, take eight dozen pictures, struggle to find one passable photo, and then spend too much time trying to make it look ok.
Thankfully there’s a better way and you don’t have to spend a fortune on professional equipment. You’ll just need to head to the store and pick up a few items.
Here’s your shopping list:
A note about the light spectrum.
I used a number of light fixtures (you can see 4 in the picture), but you don’t need to. I thought the strip fixture would give good general lighting (it does), but the light isn’t as strong as I thought it would be. The clamp lights seem to deliver the most light and offer great flexibility (they’re about 7 dollars each). I had the trouble light (with the yellow handle) and the blue lamp with taped on cardboard already around the house, so I used them.
It is important that all lights used in the photographing area be daylight bulbs. Non-daylight bulbs will give your pictures a yellowy tint. You’ll want to arrange your lights evenly to give good light to all sides of your product. Or place your lights to one side to create a moody vibe. It’s hard to have too many lights. I went back to the store for reinforcements myself.
Fiddle with your camera.
I have a four year old point and shoot camera that cost a hundred bucks, but it has quite a few handy features. If you have a digital camera, I’m guessing your camera has a few features too. I can adjust my camera’s white balance, brightness / contrast, and lighting type exposure. Then I can save these setting for later recall.
Take some pictures.
I started off lint rollering the white sheet I use for a backdrop before each shoot. But I realized fuzz and minor stains will usually disappear with enough light an proper camera fiddling so know the lint roller gathers dust. The picture below is the result of the setup shown above.
Stayed tuned for Part II where I’ll discuss the creation of a white box for taking pictures of small pieces and free photo editing software.
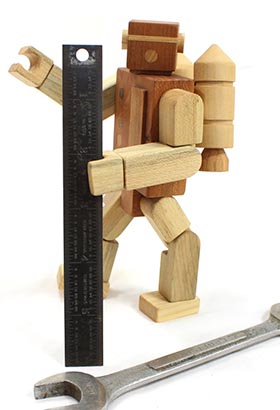
M.A.I.D. r3
/in Kid Approved, Robots /by DonIntroducing the newest Happy Bungalow Robot. For sale at Happy Bungalow’s Etsy shop.
The revision 3 followed the overly ambitious revision 2 (nicknamed MADs). The revision 2s were humanoid in shape, but had 4 arms – so they could work faster by performing simultaneous tasks. In an attempt to break into the hospitality market speed was emphasized over safety, resulting in great damage to property. Numerous lawsuits followed a brief two month service run.
The revision 3 was given softer lines, only two arms, and was introduced through a massive public relations campaign: choice product placement, celebrity endorsement, and appearances on popular television shows. The 3s served the domestic market exclusively, were reliable, and a tremendous success.
This model is a scale reproduction of the original rendered in red oak.
Couldn’t we all use a robot to vacuum our floors while serving drinks?
One Year Anniversary
/in Robots, Shows /by DonHappy Bungalow is one year old! We celebrated at our hometown show. We’ve come a long way since last year (view here)
There’s a number of new products and new show furniture to display them on.
A new easier on the back sign
The anniversary show went off well – increased sales from a year ago, loads of business cards handed out, and bunches of conversations. A tiring day, but fun. Phew.
Robots!
/in Kid Approved, Robots /by DonThe whole Happy Bungalow crew (and a few outside consultants) have been hard at work developing a new product line – Robots. The robots are scale reproductions of “actual” robots. Each robot is poseable, rearrangeable, and all kinds of fun. Yes, I own a dictionary. Each robot is issued as a limited edition series and comes with and information card explaining the history of the robot. Future work on happybungalow.com will expand on the backstory of each r0bot.
First off the line is the XR14-J
The XR14s (experimental robot model 14) were the first independent humanoid robots developed by the XyThanP Corp. Designed as a test bed for future production robots, parts and components could easily be exchanged and upgraded.
The variant J robot was designed to test long term exposure to harsh environments. Variant Js were deployed in pairs to the Centaurus A galaxy on mapping and exploration missions. While the robots primary goal was to test their systems and limits, the Js gathered databases full of scientific information.
This model is a scale reproduction of the original robot. The original materials have been rendered in oak, walnut, and steel. Magnetic parts replicate the interchangeable design of the original testbed robot.
Right now you can purchase the robot in person at one of our shows (click here) or at our etsy shop.EDIT 2015: Oh, how the times are changing. Buy a robot from our ever growing line of robots in our online toy shop here.
First Show of the Year
/in Business, Shows /by DonThe clouds are clearing, the ice is melting, and the flowers are poking out of the soil. That means it’s time to leave the shop and take the Bungalow to the masses. Last year was our first year in business and the first year doing arts / crafts shows. See pictures from the first show here. We’ve learned a lot and we’re working to put together two show packages – small for local one day shows and big for multi-day shows (an effort to spread out the back breaking).
The first show of the year was a one-day local show so it was a good time to test out some the small show package. First up is loading everything into the truck. Boy, has this step greatly improved! It’s quick and organized. Also new this year is a checklist – no more forgetting signs.
For the first show last year I built wood tables, but they’re heavy and take a some time to set up. This year I’m trying out plastic tables with table cloths. Much quicker to set up, but I need fitted table covers. The standard “sheet” type don’t look 100% professional.
For the next show I’m going to work on putting more height into the tables. I want to step the products to give them more space and visibility.
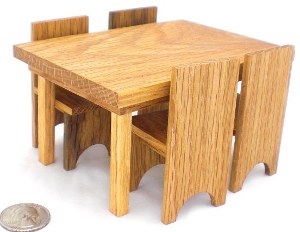
Making of Miniature Furniture
/in Miniatures, Process, Shop Talk /by DonHow is that cute kid-friendly dollhouse furniture made? Not with stained basswood. All of Happy Bungalow’s colors are natural wood.
Miniature wood furniture starts with big pieces of wood. From left to right in the picture there’s hickory, red oak, maple, and walnut.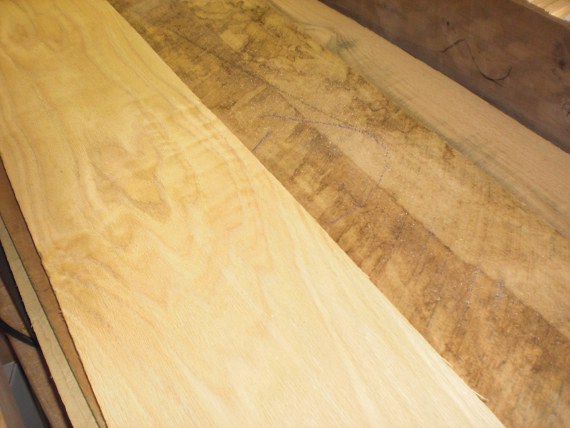 I joint and plane the boards smooth then slice the wood into thin pieces on the table saw with a shop-built resaw fence.
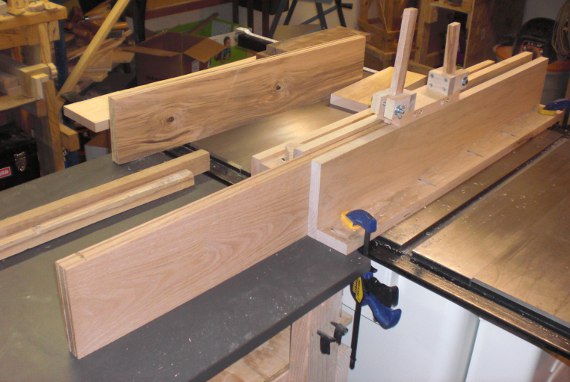
It takes several passes to slice the boards leaving the wood a bit jagged along the cut. The new thin slices of wood are smoothed on a planer and thickness sander.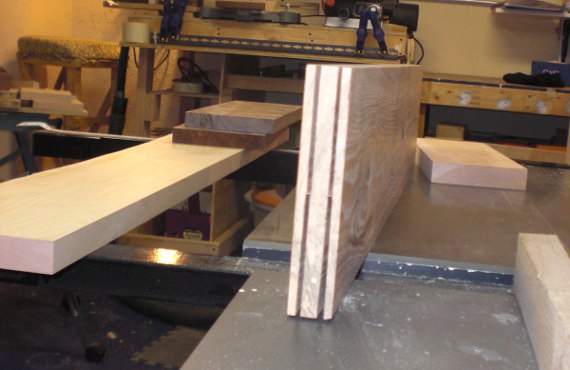 Smaller pieces of wood are made even smaller on the table saw (ripping the wood into thin strips) and miter saw (cutting strips into short pieces). After some sanding they’re sorted and ready for assembly. In the center of the picture you can see my full size drawings for these 1/12th size pieces of furniture.
 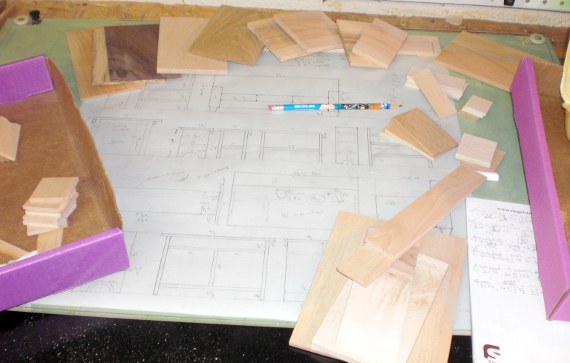 Below are some dining chairs during glue up. In the background are their companion tables. Half the chore at this stage is keeping all the pieces organized. The rest of the process is patience and a steady hand.
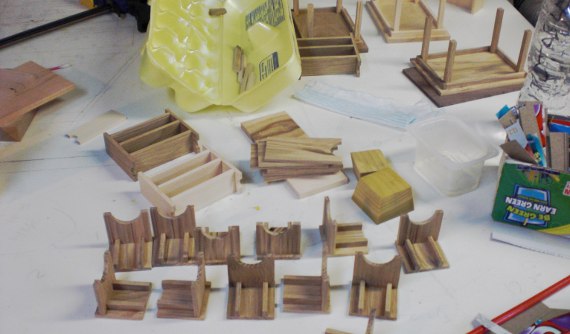
Full size clamps employed to hold together some shelves while the glue dries. I’m also a big fan of masking tape for clamping.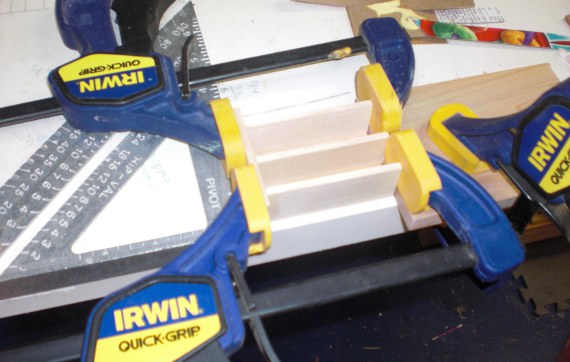
Beds, tables, chairs, and shelves are ready for finishing.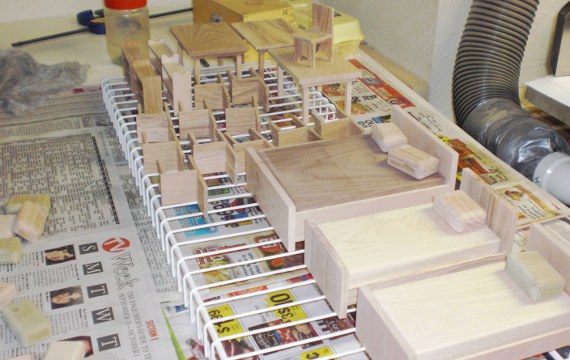
Post finishing with linseed oil the grain and texture of the wood pops.
More Dollhouse Furniture
/in Miniatures /by DonMore of the pieces for my friend’s 2 year old. All pieces are twelfth scale (one inch scale). See some other pieces here. And see how this furniture is made here.