Wood Hardware Finished with Fire

Before there were The Kids, the only residents in this Happy Bungalow were Liz and myself.  We were alone in a house in need of major renovation:

Happy-Bungalow-kitchen-detail-03-570

Let me tell you, fixer-uppers are a lot funner when you’re watching someone else do the work on television.  Though, no one at the Bungalow is shy about working hard, so out came the tools, and something like nine months later there’s this:

Happy-Bungalow-kitchen-detail-02-570

But before there were these:


Happy-Bungalow-kitchen-detail-01-570

the cabinets were devoid of hardware.  The kitchen renovation was done as frugally as possible.  Buying nice cabinet hardware would have cost more than the cabinets did.  But I figured if I could make the cabinets, I could make the hardware.  Originally I was going to make sand molds, melt aluminum cans in a cast-iron pots, and pour the molten metal into the molds.  Violla!  Rough-hewn, hand-crafted, custom-hardware.  (triple hyphenated-word threat)

Then I did a little aluminum research.  It melts at something like 1200 degrees.  I’m pretty sure my skin melts at a lower temperature.  Hmm.

So I ended up with this:

Happy-Bungalow-cabinet-hardware-wood-knob-unique-poplar-FIRE-alt001-300
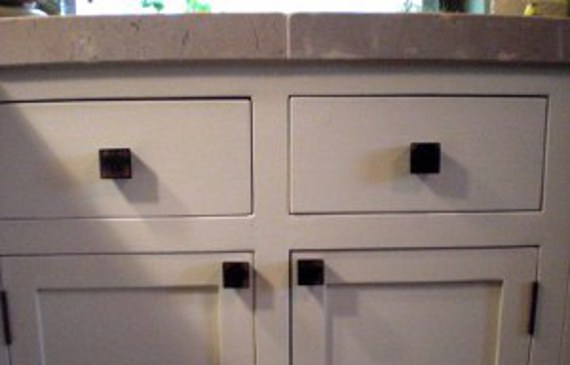
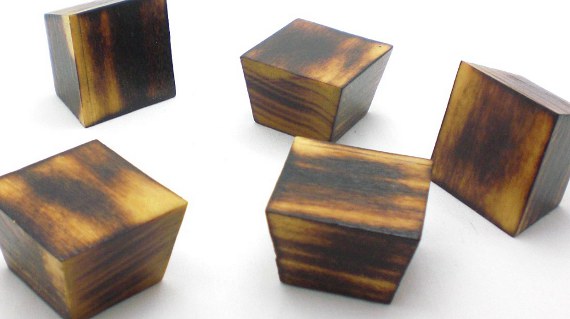
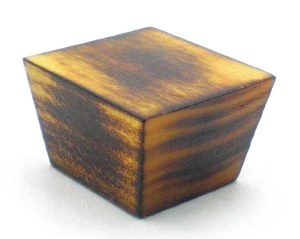
Which is the basic shape I had in mind for the aluminum hardware, just made from wood.  Though I did keep fire involved.  The dark color isn’t stain – it’s scorch marks.  With a torch, each knob was burned and quickly dunked into a water bath.

Happy-Bungalow-cabinet-hardware-wood-knob-unique-poplar-FIRE-alt004-570
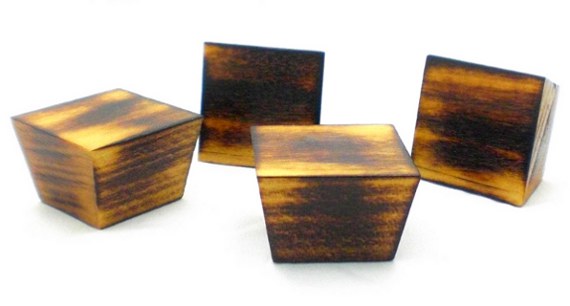
The color of each piece is different; sort of like a snowflake.  Love these knobs so much you need them in your house?  Head over to the Bungalow’s shop and pick some up today. Happy-Bungalow-cabinet-hardware-wood-knob-unique-poplar-FIRE-alt006-570

Little Red and the Wolf

I’ve been developing  a story-book character set of people and animals.  Red Riding Hood is needlessly violent and mean.  I’ve reworked it with help from public domain images and text.  Sort of like that Pride and Prejudice and Vampires.  Except with no vampires and not a hint of Mr. Darcy.

 
In a little thatched cottage, by the side of a wood, Lived an young lass, Little Red Riding Hood.

You would scarce find her equal, the neighbors all tell; so kind and smart, so cheerful and well. The rippling brook, their water from far off mountains brought; and prattled of their summits in icy statues wrought.

For them, the squirrels hoarded their nuts in hollow trees; and pounds of sweetest honey were made them by the bees. To gather these together was work enough to do; Little Red Riding Hood thought so, and so, no doubt, would you.

Blushing beneath her fingers looked up the berries red; The flowers seemed to know her and listened for her tread. Smart, loving, and beautiful as good, with daily acts of kindness, Little Red Riding Hood.

One day this young lass, to her Grandma was sent, a nice pot of butter, for her to present. Along with a cheesecake, and a new loaf of bread, for Grandma was ill and confined to her bed.

Fatigued of rhyming, off our dear Red departed. The sky was clear and the weather fair as our maiden passed peaceful pastures where gentle cows grazed away the day. Red stopped to pick flowers to cheer her grandma. Bunnies hopped along, their noses twitching as they sniffed the flowers. With a choice clutch of primrose and marigolds Red skipped down the path.

Her path led through an ancient forest, its canopy thick. So thick that the bright sun light was dim in the forest. Our Red was nervous yes, but she was also a brave young girl and marched on. For she knew her grandmother was ill and depended upon our Red.

Ahead Little Red saw a figure, but in the dim light could not make be certain who it was. “Grandma? Grandma is that you?” The figure stepped closer and Red saw its big eyes. “Grandma?”

No dear. I’m not your grandma, I’m a wolf.”

Oh yes.” Red stopped walking. “I should have known by your big eyes.”

Yes, I do have big eyes, to better see my children with.” The wolf looked nervously behind her.

My grandma could use big eyes to see me better. She doesn’t see so well anymore.”

That is ashame. I’m sorry, but I must be off now. Do look after yourself in these woods, it is not a safe place for young people.”

And in a flash the wolf was gone and Little Red was again alone in the forest. She was a little scared, but continued on. She walked for a time, all the while the forest grew darker, and then another figure appeared. Hesitantly Little Red called out, “Hello, who’s there?” Then wishfully added. “Grandma?”

No,” called the figure, “it is I, the wolf again.”

Oh yes of course.” Little Red stopped. “Your ears are much too big.”

Yes to better hear my children with. I can hear them playing far away. They’re playing quite a distance from us, but my sharp ears can hear them.”

Oh.” Quietly. “My grandma has much trouble hearing me.”

Dear, are you all right? I could walk with you to your grandmothers. I mean you no harm. I will again.”

Brave Little Red straightened her back. “Thank you, but I am fine. I have made this journey before.”

Well, do take care then.” And off the wolf went.

Without incident Red emerged on the other side of the forest to a considerably brighter sky. Less than a mile ahead was her grandmother’s cozy cottage. Feeling quite happy she skipped along the path.

And just around the bend Red saw her grandma’s home, but our brave helper felt someone watching her.

From the bushes perhaps? She stopped, looked, and saw great teeth. “Who, who’s there?”

From the bushes emerged a panting figure, mouth open, and teeth showing – the wolf. “Oh, little dear I’m sorry to startle you again. But I worry. It’s my nature. When I saw you walking alone.” She stopped to catch her breath. “I’ve been running back and forth between you and my children to keep a watch over you both. I only wanted to see you safely to your grandmother’s door. I didn’t want to surprise you again.”

“That is so kind of you. I can see my grandma’s door from here. Perhaps when I make this journey again, you could walk with me and I could meet your children.”

“Yes, what a marvelous idea! I shall look for you, if you will do the same.” Red smiled. “If you’ll excuse me, my ears hear my children calling for me.”

“Certainly.” And off the wolf went.

Little Red soon thereafter had tea with her grandma and relayed the tale of her most exciting journey through the woods.

Story Books and Nursery Rhymes

 I’m working on packing some of my animals and people into story-book collections. Little Red Riding Hood, Three Little Pigs, Old MacDonald, Ugly Duckling and the like.  All the stories that are in public domain so there’s no worries about copyright infringement.  So I found some older versions of the stories (thinking the turn of the century wording would have a nostalgic twist). Good grief are they violent. 

You can probably figure how the Three Little Pigs or Little Red Riding Hood works out – brutally.  Though it was sort of nice (?) to see one of the pigs win in the end.  I guess.  Still, it was all vicious stuff for my pre-schoolers just before bed. And I will not have the wolf in either story be a vile character – I’ve read my Aldo Leopold.

There’s even plenty of violence where you’d wouldn’t expect it.

Little Bo Peep:

“LITTLE Bo-Peep has lost her sheep,
And can’t tell where to find them;
Leave them alone, and they’ll come home,
And bring their tails behind them.

“Little Bo-peep fell fast asleep,
And dreamt she heard them bleating;
But when she awoke, she found it a joke,
For they were still a-fleeting.

“Then up she took her little crook,
Determin’d for to find them;
She found them indeed, but it made her heart bleed,
For they’d left all their tails behind ’em.”

Why do their tails have to be cut off?  I always thought, “leave them alone and they will come home, bringing their tails behind them,” a sweet line – I never imagined the tails were physically cut off.

Some stories are violent and mean.  Clearly the Ugly Duckling was tamed down in my kindergarten class.  The bullying I remember was bad enough (terrible in the original), but also in the original is a passage the ugly duckling finally makes some friends and then they’re instantly shot by a hunter.  Why?

Even baa baa black sheep.  Have you any wool little sheep?

Quote the black sheep:

“”Yes, marry, have I,
Three bags full:
One for my master,
And one for my dame,
And none for the little boy
Who lives down the lane.”

Phh . . .   Why none?  You have three bags you stingy sheep?  I say bag the original text (pun intended).  I’ve rewritten it:

“Yes, marry, have I,
Three bags full:
One for my master,
And one for my dame,
And the best one for the little boy
Who lives down the lane.”

So I’m in the process of rewritting a lot of these old tales.  I’ll keep some of the text, but most is headed for my computer’s recycling bin.  The world is violent and mean enough – children will be exposed to it all and yes, I’d like to keep them from it as best I can.

Making of Miniature Furniture

How is that cute kid-friendly dollhouse furniture made?  Not with stained basswood.  All of Happy Bungalow’s colors are natural wood.

Miniature wood furniture starts with big pieces of wood.  From left to right in the picture there’s hickory, red oak, maple, and walnut.Happy-Bungalow-wood-dollhouse-furniture-minature-process-alt001-570I joint and plane the boards smooth then slice the wood into thin pieces on the table saw with a shop-built resaw fence.Happy-Bungalow-wood-dollhouse-furniture-minature-process-alt002-570

It takes several passes to slice the boards leaving the wood a bit jagged along the cut.  The new thin slices of wood are smoothed on a planer and thickness sander.Happy-Bungalow-wood-dollhouse-furniture-minature-process-alt003-570Smaller pieces of wood are made even smaller on the table saw (ripping the wood into thin strips) and miter saw (cutting strips into short pieces).  After some sanding they’re sorted and ready for assembly.  In the center of the picture you can see my full size drawings for these 1/12th size pieces of furniture.  Happy-Bungalow-wood-dollhouse-furniture-minature-process-alt004-570Below are some dining chairs during glue up.  In the background are their companion tables.  Half the chore at this stage is keeping all the pieces organized.  The rest of the process is patience and a steady hand.Happy-Bungalow-wood-dollhouse-furniture-minature-process-alt005-570

Full size clamps employed to hold together some shelves while the glue dries.  I’m also a big fan of masking tape for clamping.Happy-Bungalow-wood-dollhouse-furniture-minature-process-alt006-570

Beds, tables, chairs, and shelves are ready for finishing.  Happy-Bungalow-wood-dollhouse-furniture-minature-process-alt007-570

Post finishing with linseed oil the grain and texture of the wood pops.Happy-Bungalow-wood-dollhouse-furniture-minature-process-alt008-570

New Wood

The shop is not-quite literally bursting at the seems with wood, but it’s getting hard to find more places to squirrrel it away.  I’ve found some good deals lately and just can’t pass it up.  Yesterday I picked up some wood – maple, walnut, and oak.

Included in the bunch is a 13″ wide piece of oak – the same width of my planer.  Not sure what to do with it, but it’s not everday your find a piece that big in that good shape.

It all looks rough now, but give it some time and it turns into something like this

Happy Bungalow Wood walnut maple oak

Wood Clocks Process #4 – Finished Product

Missed the creation of the clocks?  Read part one, part two, and part three.

Hooray!  The hardwood clocks are finished (get it?  finished?), their dials have been painted, the movements installed, and the hangers hung.  Shown below is a strip clock (I’m open to catchier names) and the oh-so-cleverly named five grain clock (five different types of wood).  None of the wood was stained – the colors you see are natural.

Happy Bungalow Hardwood Clocks - Five Grain and Strip

A closer look at the five grain clock.  The darkest wood is walnut and the lightest is hickory.  The greenish wood is poplar.  The reddish wood with the wavier grain is cherry, and the reddish wood with the tighter grain is red oak.  The dials are metal and hand painted with yellow enamel paint.

Happy Bungalow Five Grain Clock

The strip clock only has three woods.  The dark is walnut and the lightest is hickory.  Cherry is the friendly red.  Once again, the dials were hand painted yellow.

Happy Bungalow Strip Clock

Below is the rear of the five grain clock.  Each clock has three separate hangers so you can mix up the position of the clock.  Of course after I attached the hangers I discovered you can’t willy-nilly put on the hangers – Twelve O’clock doesn’t coordinate with any position.  After some dial spinning and head scratching I figured it out and repositioned two of the hangers.  Oops (these clocks will have a discount in the etsy shop).

All of the woods are labeled on the back – no need to be a wood expert to impress your friends.  “Yes, this is cherry, and that is hickory.”  The clock crafted date and signature is listed as well.

Happy Bungalow Five Grain Clock

http://happybungalow.com/blog/2011/09/22/wood-clocks-process-3/

Wood Clocks Process #3

In the previous post our wood clocks were dry-fitted and glued-up (read the post here).  You may remember some dried up glue that leaked out of the joints.  The glue was knocked away with a sander as were any wood segments that were higher than the others.  Despite the best efforts of the heavy took box, some of the pieces moved up oh so slightly.  Ideally I’d run the clocks through a planer (mine isn’t wide enough) or a wide belt sander (nobody has dropped one off at the shop).  So I sand them down with a 1/3 sheet sander.

Happy Bungalow Wood Clock Process 10 Wood Clocks Post Sanding

The next step is to trim up the clocks.  I lay out the circle with my drafting compass (in the upper right in the picture below) and lay out a circle as big as the smallest wood segment.  In short – I make the clock as big as I can.  I trim the circles on the bandsaw, sand the edges smooth on a stationary belt sander, and bring them back to the table.

You can see how much sanding dulls the look of the wood.  I plane all my wood in the shop (three giant knives spinning really fast and slicing away wood) – which leaves the wood ultra smooth.  Sanding also smooths the wood, but instead of slicing the wood, the sanding compresses the grain of the wood, so it doesn’t look as crisp.  But don’t worry, we’re going to fix that during the finishing.

Happy Bungalow Wood Clock Process 11 Wood Clocks Cut To Circles

There’s one last step before the finishing – cutting holes for the clock movement (the gizmo that turns the clock hands).  I start with drilling a small hole through the center on the front.  Then I drill a big hole in the back (I’m thinking the Bungalow’s resident hamster may find some use for them).

This part’s a little tricky – drill too far and the clock is ruined.  Drill not far enough, and well – just drill some more.  Fortunately my 3-1/8 inch drill bit isn’t very fast.  Notice the clamps in the picture.  The clock must be clamped to something secure as the large drill bit creates a lot of torque.

HappyB ungalow Wood Clock Process 12 Wood Clock Drilled For Clock Movement

Now the fun part – finishing.  I finish the clocks with pure tung oil – which penetrates the wood to protect it.  Pure tung oil is a legitimate natural finish.  The only thing in my tung oil?  Tung oil.  There’s no laundry list of additives and chemicals on the side of the jar.  The only thing I add is citrus solvent which thins the oil to aid penetration into the wood.

Citrus solvent?  It’s natural too – derived from oranges.  And it smells great – the whole shop smells like oranges.  The tung oil gives the wood a lot of pop and shows off the grain well.

Grain?  The upper left clock has alternating segments of walnut and cherry.  The lower clock has cherry, walnut, poplar, red oak, and hickory.  The strip clock has hickory, walnut, and cherry.

Happy Bungalow Wood Clock Process 13 Finished With Tung Oil

Read the fourth and final post here

Wood Clocks Process #2

In  part one of the wood clocks process series (read here) I talked about cutting a number of angled pieces of wood.  A box-full of wood pieces, in fact.  I lay all the pieces out on a table and go to work creating a pleasing composition.  With some fussing, this process goes easy until the clock circle is about seven-eigths full.  Then it’s time to trade out triangles here and there to make a 360 degree circle.  To make certain of this, I tape the pieces securely together.  Once I have a working circle I move some of the triangles around to fuss with the layout.

Happy Bungalow Wood Clock Process 06 Walnut Cherry Dryfit Layout

Next comes the glue.  I lay down some wax paper on the table to keep the clock from gluing itself to the table.  There’s between 25-35 pieces in each clock and each side needs glue applied evenly.  I have to move quickly so the glue doesn’t set before I’m finished.  You can see the glue squeezing out in the picture below – this is a good thing as it means the joints are filled.

Once all the glue is on and the pieces are in place I put a strap around everything – that’s the black band in the picture.  I cinch the strap then insert blocks of wood around the perimeter.  The blocks help to make up for the different lengths of wood and give added clamping pressure.  Then I wipe all the excess glue away with a damp cloth.

Happy Bungalow Wood Clock Process 06a Walnut Cherry Wet Glue

Next comes another sheet of wax paper and some MDF spacers to clear the wood blocks on the perimeter.  I pile on my heaviest tool box and anything else that’s heavy and handy.  This weight keeps the pieces flush.  You can see some glue squeezing out on the sides – but this isn’t a problem as the clock will be trimmed later.

The picture shows a wood-strip clock being glued up – more on that below.

The clock dries for a while before the weight is removed.  You can see a little glue that leaked through, but it’s nothing a little sanding won’t clear up.

Happy Bungalow Wood Clock Process 07 Walnut Cherry Glueup

The picture below is one of the wood-strip clocks.  It’s like the other clocks except it only has one angle, so there’s much less math involved.  I lay out the strips, then cut each strip roughly to length so I don’t loose any more wood than necessary.  On the left you can see a rejected angle piece and a buddy angle that I used to clamp everything together.

The strip clocks don’t need the belt clamp – just a pair of bar clamps (and the heavy weight on top).  More on trimming, sanding, and finishing in the next post.

Happy-Bungalow-Wood-Clock-Process-09-Strip-Clock-Post-Glueup

Read the next post in the series here

Wood Clocks Process #1

Hardwood Clocks are in the works here at the Bungalow and I’m here to give you a behind the scenes tour of their construction.

At first I made templates for the clocks out of cereal boxes.  I figured I could mix and match angles, colors, and the like to make pleasing compositions.  I took out my compass (hand drafting isn’t dead yet) and cut out 40 or so different angle templates.  Then I mixed and matched until the angles added up to 360 degrees (see below).

Happy Bungalow Wood Clock Process 01 Cereal Box Template Layout

Now I could be assured my cut pieces of wood would form a perfect 360 circle.  All I had to do was transfer the exact angles to select pieces of wood and cut those angles exactly with no margin for error.

Laying out the templates on the wood went well, after that things sort of fell apart.  I selected five different woods for the first clock (from top to bottom in the picture) – cherry, hickory, walnut, red oak, and poplar.

Happy Bungalow Wood Clock Process 02 Template Layout On Wood

I transferred the angles to the wood with a pencil, cut the pieces to length on the miter saw then turned to the tablesaw.  Here is where my grand plan began to unravel.  Just how do I cut those angles with no margin for error?  I looked around for a laser wielding robot, but I don’t have any in the shop.  The best I could come up with was to fall back on high school geometry.

I cut small pieces on the tablesaw with a sled that slides on the top (and keeps my fingers far away from the blade) – see below.

Happy Bungalow Wood Clock Process 03 Cutting On Tablesaw

The sawblade leaves a cut line the exact width of the blade (handy) – this forms one side of a plane.  Directly above this line I attached a string that I could site the angle of the cut – forming the second side of a plane.   Line up the sawblade, the pencil mark on the wood, and the string – and the wood will be cut exactly.  Assuming the pencil line intersects the blade/string plane exactly.  You can see this in the picture better.

Happy Bungalow Wood Clock Process 04 Cutting Segments On Tablesaw

Of course no matter how “well” I eyeballed it, the angles couldn’t be cut exactly so I ditched that plan and just cut a load of different angles, figuring if I had enough angles I could put together a circle later.  You can see the blue clamps in the picture above – super handy for holding the wood in place securely and keeping me as safe as possible.

Below you can see stacks of the cut wood.  On the top are pieces of walnut.  The lower left is hickory and the lower right is cherry.  With the cherry you can see how I make the cuts – rotating the wood to keep the grain in as radiating a pattern as possible.  In the next post I’ll talk about layout and glue-up of the clocks.

Happy Bungalow Wood Clock Process 05 Wood Segments Laid Out Post Cutting

Read the next post in the series here